Recently, I was fortunate to move into a new home that was pre-wired with Cat5 Ethernet. One of the first things I did was open my home's structured wiring closet; however, it looked like the previous owner did not take advantage of the wired network as there was no switch. I took this as a welcomed opportunity to take on a small networking project with the following goals:
- Provide Gigabit connectivity throughout the house,
- Segment the various devices into separate logical networks via VLANs, and
- Attempt to roll my own Gigabit router using pfSense. (I recently heard about pfSense on Security Now, episode #530.)
- Learn a bit about VLANs and pfSense.
Before we get started, I must make it clear that I am not a network engineer, but love to take on DiY technical projects. Now that we have that disclaimer out of the way, here's an overview of the solution.
Home Network Architecture
My goal with the architecture above was to provide at least 4 separate networks:
- ghome-office - A network dedicated for work use.
- ghome-office2 - A network specifically for my wife. As much as I lover her, I would prefer her devices to be a on a separate network.
- ghome-guest - A network dedicated for visitors. To be honest, I don't trust other people's machines. I know that my family and friends would never knowingly attack my network, but let's face it, I've been called more than once to "clean" infected Windows machines.
- ghome-iot - A network dedicated to the "Internet of Things" or IoT. Similar to my statement above, I really don't trust my HVAC, refrigerator and smart TVs (FireTV, Chromecast, etc.) either. These devices are rarely kept current with patches or come pre-configured with unsecure services.
Now that I had a plan I wanted to ensure that all devices supported 802.1Q (i.e., VLAN tagging). Essentially, VLAN tagging allows traffic to be tagged with a VLAN ID so that it can be segmented onto its own virtual local network. I had to be careful in my research that the router, managed switch and wireless access point all supported this specification.
Hardware & Software
Router
As I mentioned above, I really was itching to experiment with pfSense. I have been a long time listener of Security Now with Steve Gibson and Leo Laporte and Steve had nothing but praise for the feature richness offered by pfSense. Up until this point I had been using an old Linksys WRT54G v1 Broadband router with the DD-WRT firmware. Sadly, this little box was only a 10/100 router and was the bottleneck with my Cox 100Mbps connection.
For the router hardware I decided to use an Old Sun Ultra 40 workstation with dual Gigabit Ethernet adapters, 16 GB RAM and 2x Dual Core AMD Opteron Processors. Yes, this hardware is overkill, loud and produces a lot of heat, but I was not quite ready to purchase small form factor hardware without evaluating pfSense first.
For the installation, I opted to run pfSense off a USB thumb drive.
Switch
I knew that I wanted a gigabit managed switch, also known as a smart switch, that was capable of supporting 802.1Q VLANs. I had a secondary goal of ensuring that I could fit the switch in my home's structured wire closet. After pouring over reviews, I settled on the Netgear 108T 8-Port Gigabit Smart Switch and was able to pick it up on Amazon for $72.99.
Access Point
For the access point, I required two primary features: 1) a gigabit network interface and 2) a device that allowed multiple SSIDs and VLANs. Again, after some research I went with the Cisco Small Business WAP 321 access point. This one was a bit pricer at $131, but seemed to do what I needed.
Configuration & Step
Router
After creating a bootable pfSense USB thumb drive, I set out to execute thefollowing configuration.
| Interface Name | Network | VLAN ID | SSID | Description |
|---|---|---|---|---|
| LAN | 192.168.1.0/24 | 1 | ghome-office | Gaston's Office Network |
| GHOME_OFFICE_2 | 192.168.2.0/24 | 100 | ghome_office2 | Wife's Network |
| GHOME_GUEST | 192.168.3.0/24 | 200 | ghome-guest | Guest Network |
| GHOME_IOT | 192.168.4.0/24 | 300 | ghome-iot | Internet of Things Network |
The router already had a default VLAN (i.e., VLAN 1) that I used for my office network, so I needed to create three (3) more VLANs: 100, 200 and 300 that map to my wife's office network, my guest network and Internet of Things network, respectively.
Then, I assigned each VLAN, to a network interface. I decided on the following interface naming convention: LAN (this is my home office), GHOME_OFFICE2, GHOME_GUEST and GHOME_IOT.
Next, I configured each interface with the IPv4 network settings listed in the table above. The screenshot below is for the GHOME_OFFICE2 interface. I simply repeated the same steps of enabling the interface and defining the IPv4 configuration for the other interfaces.
Once all the interfaces and VLANs were configured, I set up the DHCP server for all four (4) networks. As before, the screenshot below is for the GHOME_OFFICE2 interface; however, the same process is repeated for each interface.

Now that I had all the network interfaces and VLANs defined, I needed to configure some firewall rules so that I could limit each network as follows:
- GHOME_OFFICE - Has full access to all VLANs (192.168.1.0/24, 192.168.2.0/24, 192.168.3.0/24 and 192.168.4.0/24) and the Internet
- GHOME_OFFICE2 - Has full access to its network (192.168.2.0/24) and the Internet
- GHOME_GUEST - Has full access to its network (192.168.3.0/24) and the Internet
- GHOME_IOT - Has full access to it's network (192.168.4.0/24) and the Internet
I defined firewall aliases to express the above rules. The example below shows the rules for the GHOME_OFFICE2 interface.
At this point, the router was mostly configured for my target architecture. (It should be noted that other configuration steps for security and performance were also executed.) For example, I configured pfSense to use OpenDNS' and Google's DNS servers. The screenshot below details the summary of the configuration.
Switch
The next step was setting up the Netgear 108T switch. In my architecture, I needed to connect the wireless access point to a wired port and configure it to pass multiple VLANs. For this to work, I had to configure the port that the access point was plugged into as a trunk port. In my case, I had the AP plugged into port 4. Secondly, I needed it to pass VLAN traffic for VLANs: 1 (ghome-office), 100 (GHOME_OFFICE2), 200 (GHOME_GUEST) and 300 (GHOME_IOT). So, I created three (3) additional VLANs.
Next, I needed to define the VLAN membership.
Note: Port 1 is the trunk port for the router and Port 4 is the trunk port for the wireless access point.
- For VLAN 1, I needed all ports defined as untagged.
- For VLAN 100, I needed ports 1 and 4 defined as tagged.
- For VLAN 200, I needed ports 1 and 4 defined as tagged
- For VLAN 300, I needed ports 1 and 4 defined as tagged
Access Point
Now that I had the router and switch configured, the last step was to configure the Cisco Small Business WAP321 access point. This amounted to defining each wireless network (e.g., ghome-office, ghome-office2, ghome-guest and ghome-iot) and mapping them to the respective VLANs (e.g., 1, 100, 200 and 300).
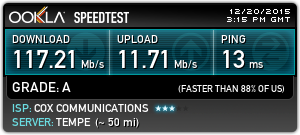
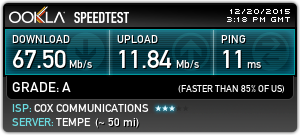
Testing the Performance
Once the network was configured, I opted for two speed tests: one wired and one over the wireless using http://speedtest.net. The results were great and pretty much what I expected: ~117 Mbps on the wired network and ~67 Mbps over the wireless network.
Troubleshooting
Initially, I was not sure if the wireless access point was encoding 802.1Q VLAN IDs in the Ethernet frames, so I enabled port mirroring on the Netgear switch. Basically, I mirrored all traffic on port 4 (i.e., the wireless access point port) to port 8 (an unused port). Then, I was able to connect a second laptop to port 8 and watch the network traffic using a network sniffer (Wireshark). It turns out that the AP was encoding the VLAN IDs correctly for each wireless network; however, I had misconfigured the trunk port.
Conclusion
In summary, this setup is probably overkill for most home networks, but is an ideal solution for users who want fine-grain control over their networked devices. Now that I have proved that pfSense is a viable solution for a DiY router, I will be looking for small form factor hardware to replace my bulky Sun Ultra 40. I'm currently looking into building a mini-itx solution or purchasing hardware from pfSense or Soekris with a budge of around $300.